Among the various patterns, the bull flag vs bear flag patterns are important signals that many traders rely on to make informed decisions. This article will delve into bull vs bear flags, explaining what they are and why they are essential for any trader aiming to achieve consistent profits.
1. What is Bull Flag Pattern?
The bull flag pattern marks a brief pause within an ongoing upward trend, allowing traders to take advantage of continued bullish momentum. Typically, this pattern develops in the following manner:
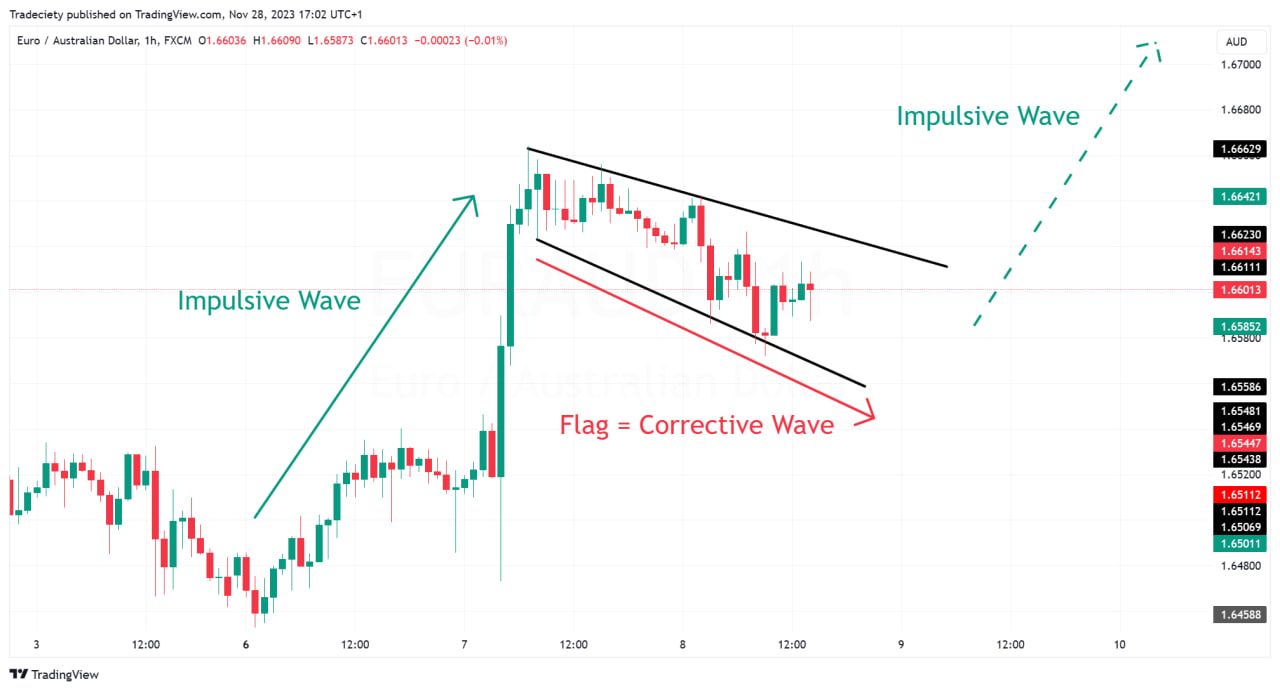
- Sharp Upward Move (Flagpole): A bull flag pattern starts with a significant upward price movement, creating the flagpole. This spike typically signals strong buying pressure and a positive market outlook.
- Consolidation Phase (Flag): Following the flagpole, the price consolidates, moving slightly downward and forming the flag. This phase represents a momentary pause in the upward trend.
- Volume Dynamics: During this consolidation, trading volume may decrease or remain steady compared to the prior uptrend. This suggests a temporary slowdown in buying activity as traders assess the next market move.
- Price Break: After the consolidation phase with a volume spike, a breakout may appear above the upper trendline indicating that the uptrend is likely to continue.
The bull flag pattern is often viewed as a bullish continuation signal, implying that the uptrend will likely resume after the consolidation phase. Traders often enter long positions when the price breaks above the resistance line, expecting further upward movement.
2. What is Bear Flag Pattern?
Conversely, bear flag patterns indicate the potential for a downtrend to continue, providing traders with opportunities to profit from falling prices. These patterns mirror bull flags but in a bearish context:
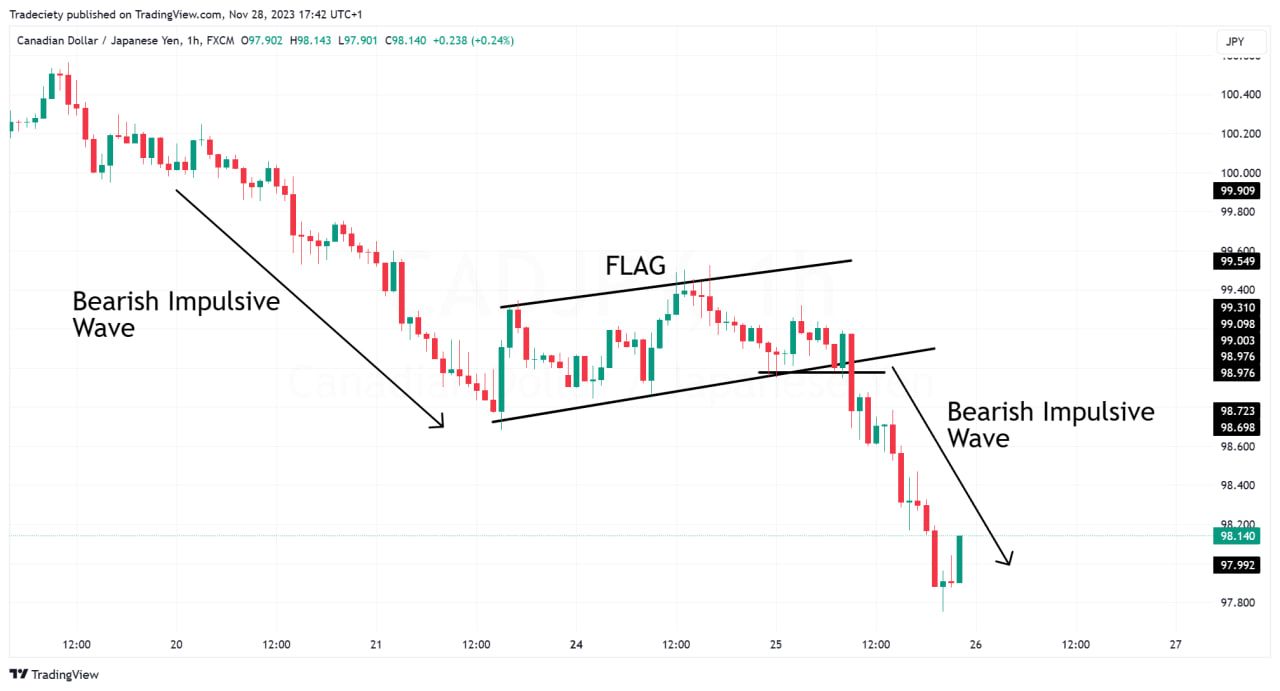
- Sharp Downward Move (Flagpole): Bear flag patterns commence with a sharp drop in price, driven by strong selling pressure, signaling a negative market sentiment.
- Consolidation Phase (Flag): After the initial drop, the price consolidates, often moving sideways or slightly upward, forming the flag and indicating a brief pause in the downward trend.
- Volume Dynamics: Like bull flags, bear flag patterns typically show a reduction or stabilization in volume during consolidation. However, bearish trends may feature higher overall volume, indicating stronger selling pressure.
- Price Break: In bear flags, a breakout below the lower trendline suggests that the downtrend will persist.
In the context of bull flag vs bear flag patterns analysis, the bear flag is recognized as a bearish continuation signal, with the downtrend expected to resume after consolidation. Traders often look to short-sell when the price breaks below the support level, aiming to capitalize on further declines.
3. Why Are Bull Flag vs Bear Flag Important?
Recognizing and understanding the significance of bull flag vs bear flag patterns is essential for traders aiming to navigate the complexities of the financial markets. These patterns are valuable tools for predicting market behavior and optimizing trading strategies.
3.1. Predict Market Trends
The ability to distinguish between bull flag vs bear flag patterns allows traders to identify the prevailing trend in the market. A bull flag indicates a strong continuation of an uptrend, while a bear flag suggests that a downtrend is likely to persist. By recognizing these patterns early, traders can align their strategies with the dominant market sentiment, increasing their chances of profitability.
3.2. Identify Entry & Exit Timing
Timing is everything in trading, and bull flag vs bear flag patterns provide clear signals for entering or exiting trades. For instance, entering a long position during a bull flag breakout or a short position during a bear flag breakdown can lead to more favorable trade outcomes. Understanding these patterns allows traders to set more accurate stop-loss levels, minimizing risk while maximizing potential gains.
3.3. Support Technical Analysis
The bull flag pattern vs bear flag pattern are integral to technical analysis, providing traders with visual cues that complement other indicators. These patterns reinforce signals from moving averages, trendlines, and volume analysis, offering a more comprehensive view of the market. By integrating these patterns into their analysis, traders can enhance their decision-making process and improve overall trading accuracy.
4. Trading Strategies with Bull Flag vs Bear Flag
Trading using only bull flag vs bear flag is not recommended. Like any chart pattern, trading strategies based on these patterns are more effective when integrated into a comprehensive system with additional rules and guidelines. Below are some advanced strategies that incorporate bear flag vs bull flag to improve your trading decisions.
4.1. Strategy 1: Moving Average Pullback
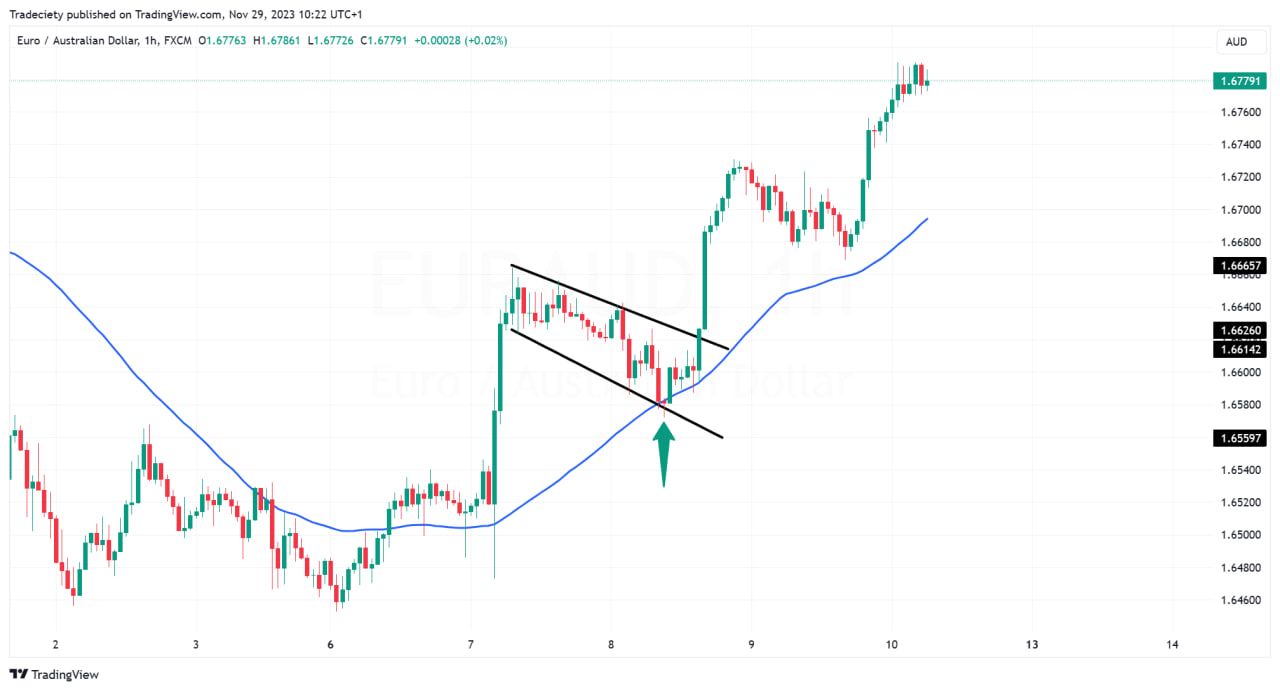
Adding moving averages (MA) into your trading strategy can significantly improve the accuracy of Bull Flag vs Bear Flag patterns. A straightforward approach is to use the 50 SMA to identify bull flag pullbacks more objectively. This method helps distinguish between impulsive and corrective phases in the market.
For instance, in the chart below, the 50 SMA acted as a support level during the formation of a bull flag.
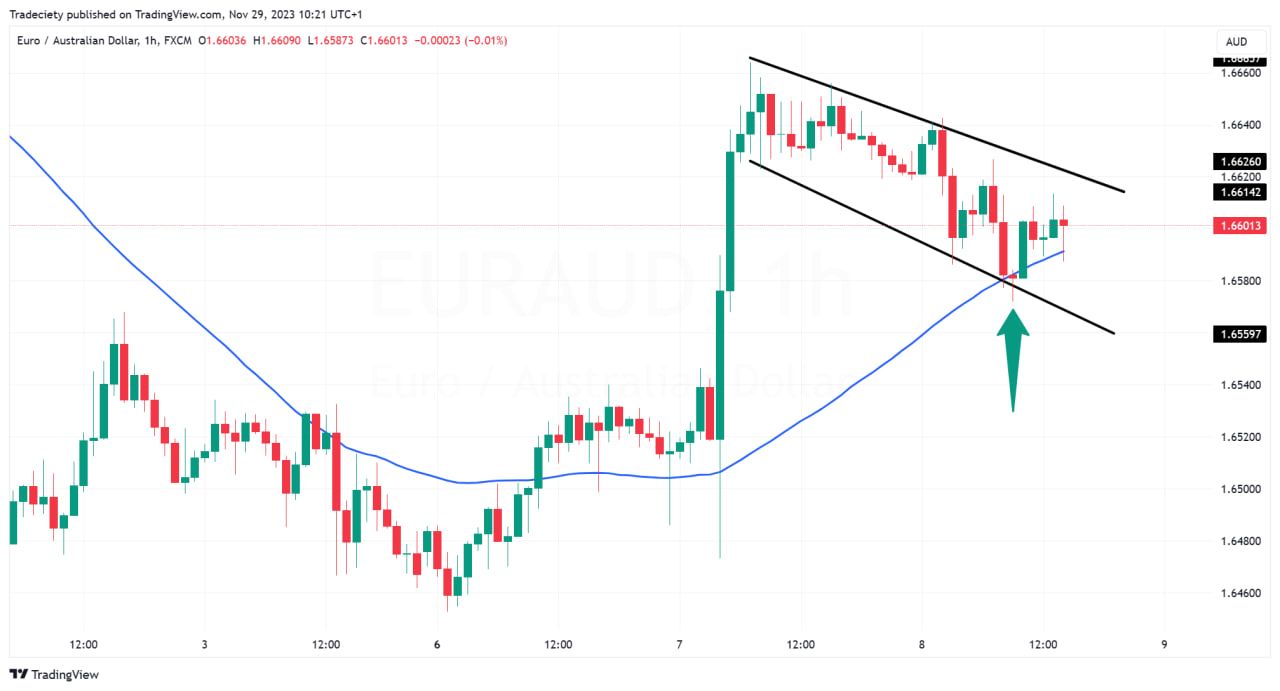
It’s important to note that the moving average doesn’t always need to hold perfectly. Even if the price dips below the moving average, the bull flag can still be valid. The moving average simply serves as a guide to spot pullbacks and recognize different market phases.
4.2. Strategy 2: Multi-Timeframe Analysis
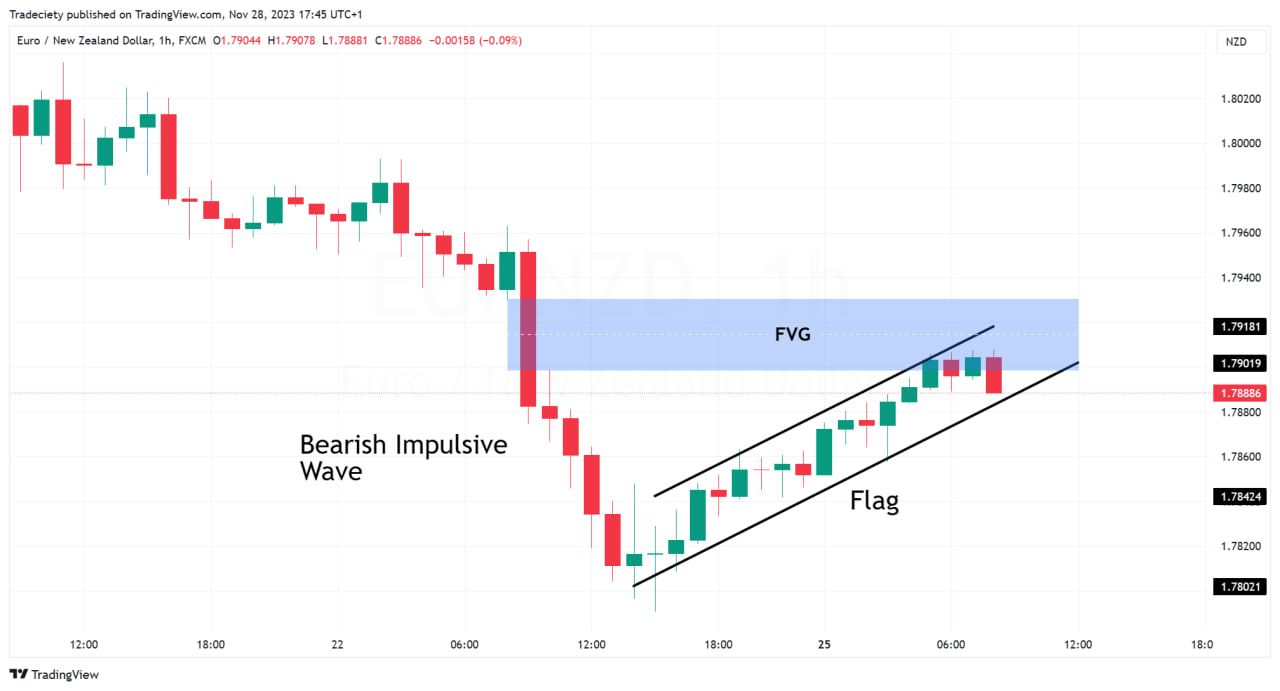
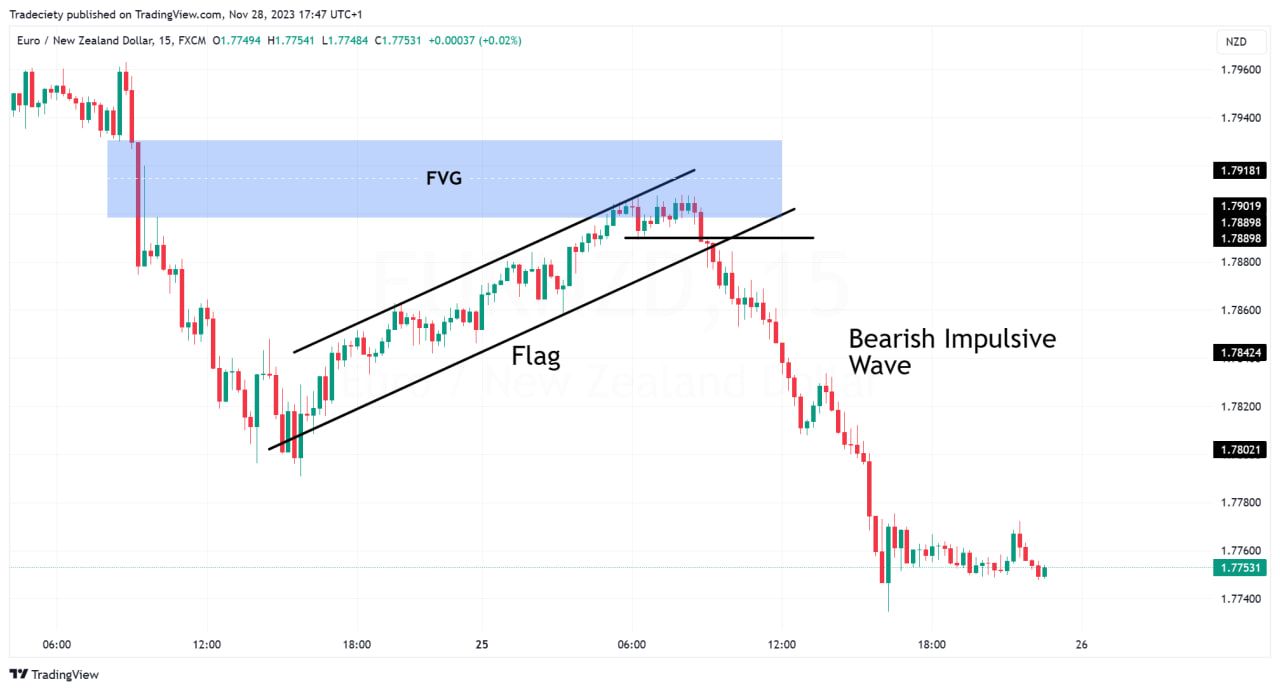
Applying Bull Flag vs Bear Flag patterns across different timeframes can enhance the accuracy of your trades. For example, when a bear flag forms on the 1H timeframe, rather than trading the breakout immediately, you can look for additional confirmation signals to increase the trade’s reliability.
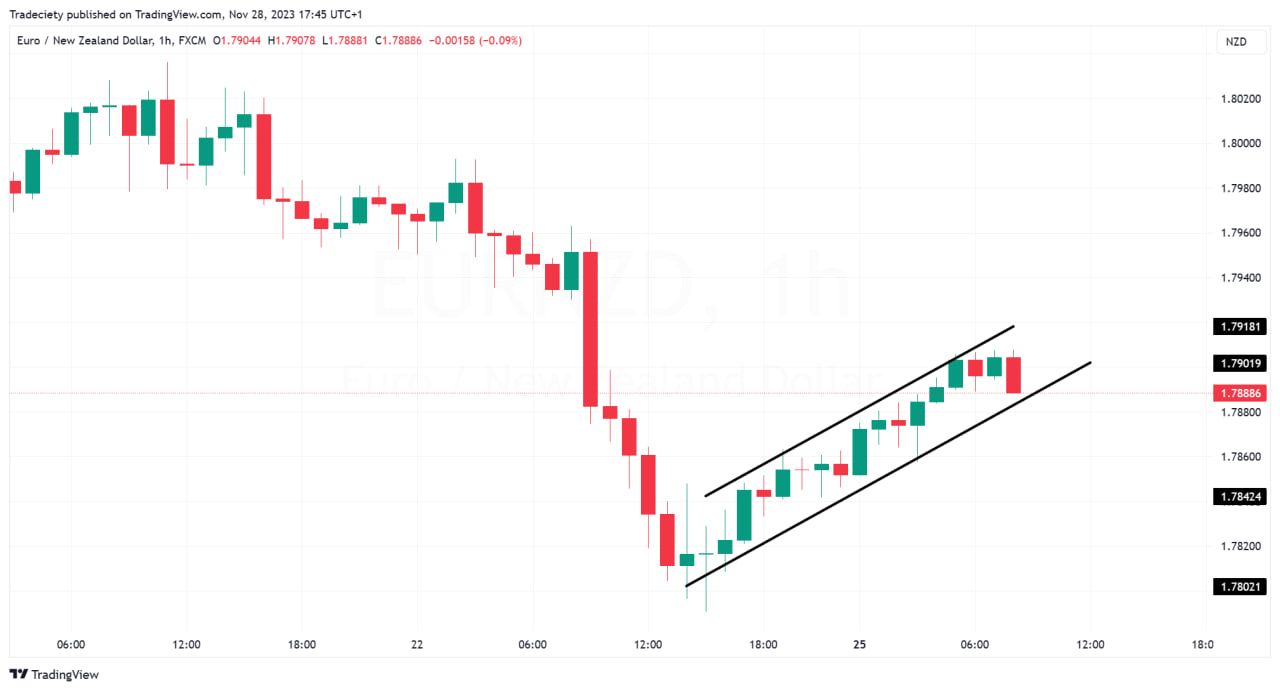
In the chart below, a bear flag is shown on the 1H timeframe. The price approaches a previous Fair Value Gap (FVG), a concept used in smart money theory. Similar to traditional support and resistance levels, prices often react strongly to FVGs, making this a powerful additional signal when trading a bear flag.
Next, by analyzing the 15-minute lower timeframe, further confirmation can be found: the price has broken a swing low and created lower lows, a clear indication of a trend shift. The price also drops below the 15-minute 50-SMA, signaling a momentum change.
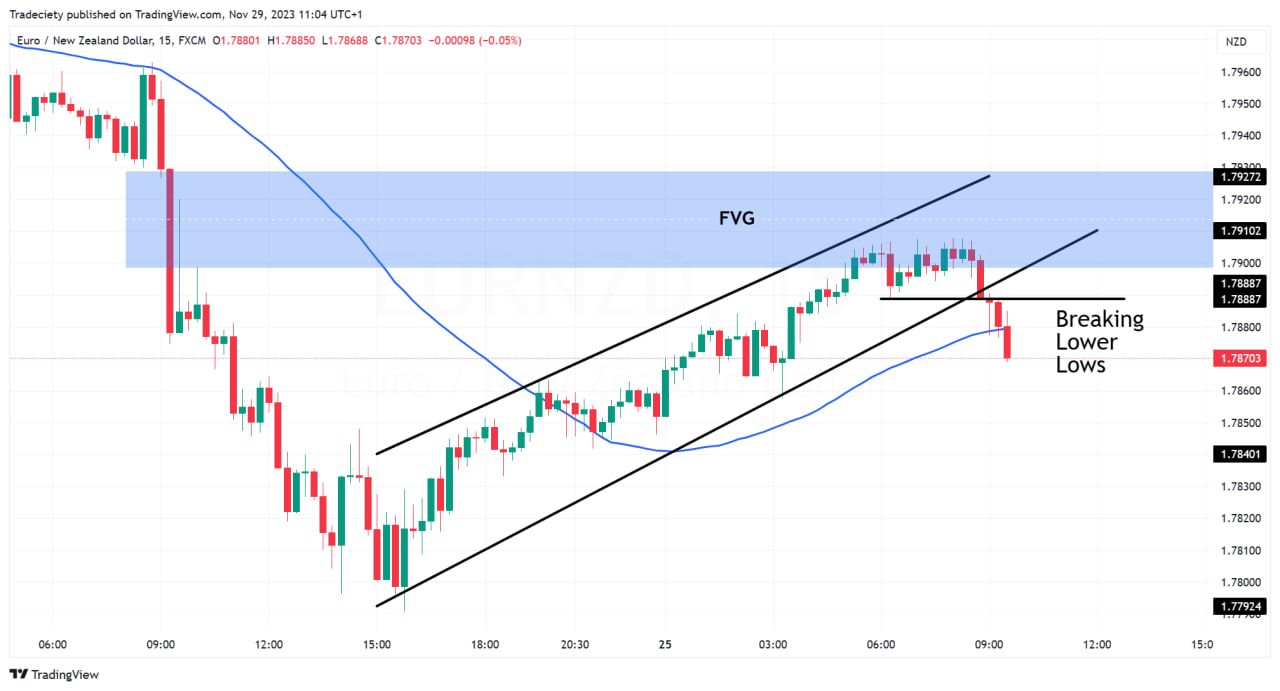
Trading on lower timeframes often offers a better reward-to-risk ratio. By adding multiple layers of confirmation, you can filter out false signals and increase the chances of a successful trade. Following the bear flag breakout, the price continued its downward trend with a strong bearish wave.
4.3. Strategy 3: Complex Moving Averages
Another effective strategy involves using multiple moving averages in conjunction with Bull Flag vs Bear Flag patterns. Start by filtering trades with Fair Value Gaps (FVGs), only considering bull flags that have entered an FVG.
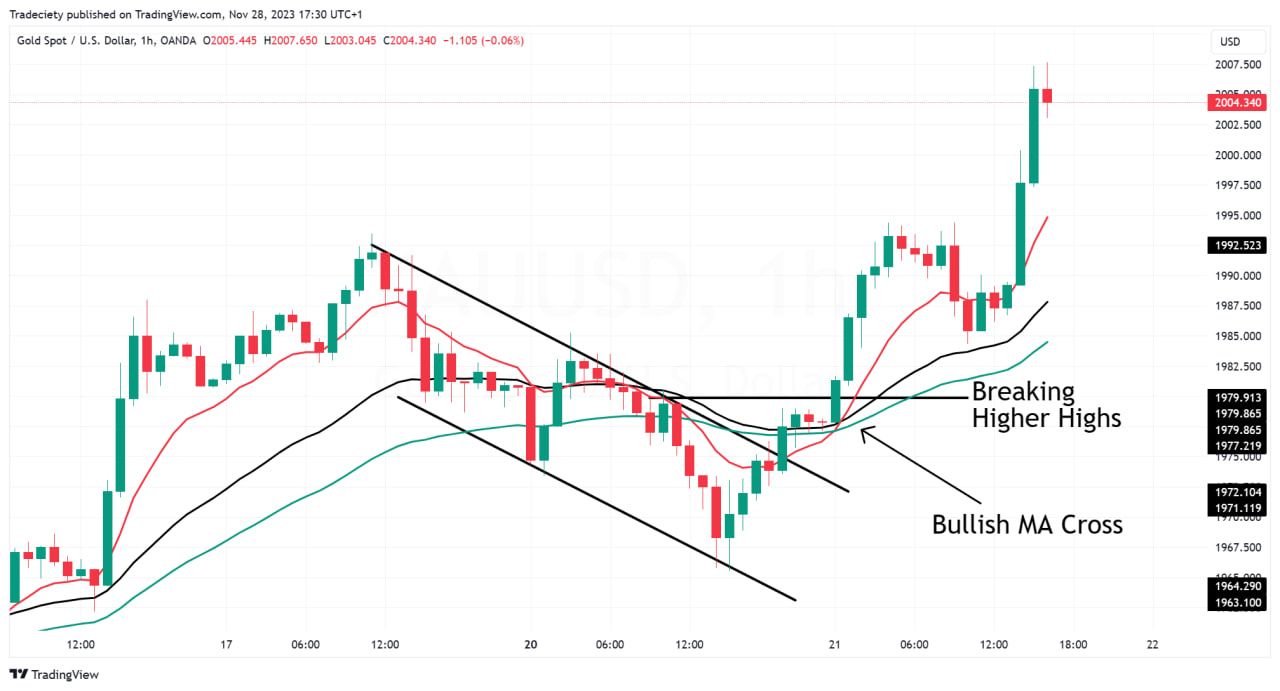
In the example below, a bull flag pattern moves into an FVG, fulfilling our initial criteria.
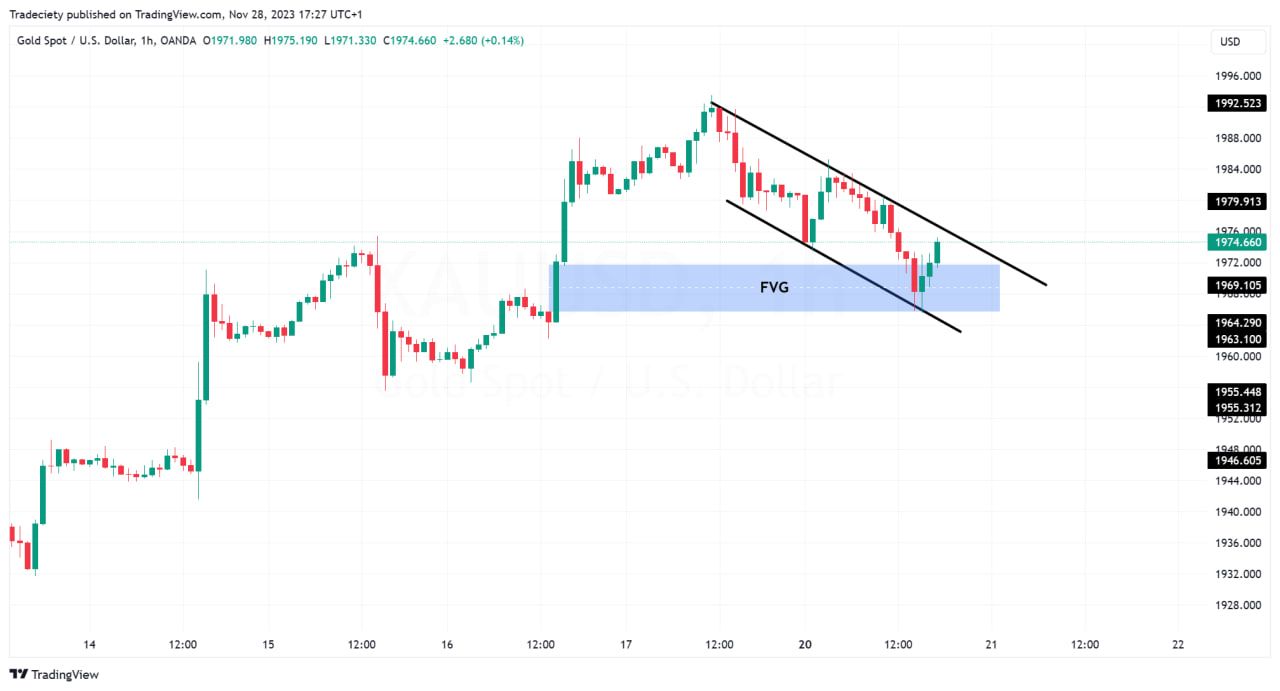
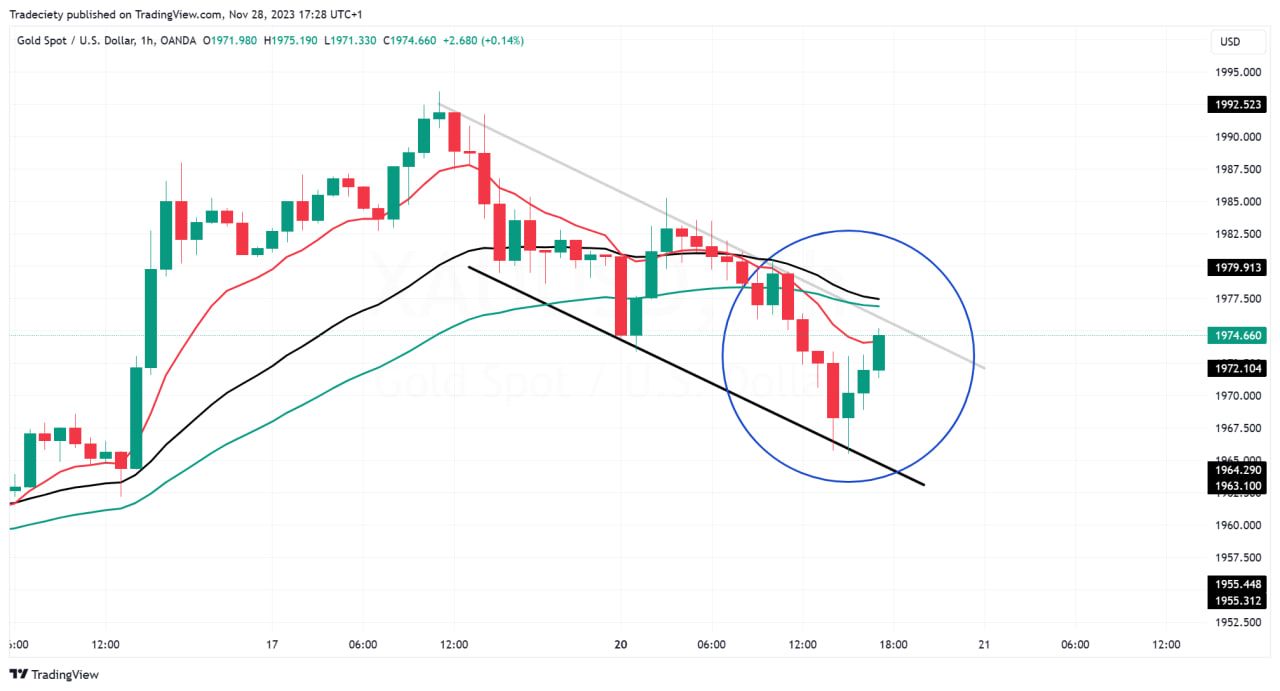
Next, draw the 10 EMA, 30 EMA, and 50 EMA to the chart. As the price dips below all three moving averages during a pullback, it signals a significant drop. Entering a long position at this stage might be premature, as the price is still in a bearish momentum phase.
After the bull flag breakout, the price climbs above the moving averages, and the short-term 10 EMA (the red line) crosses above the longer-term averages. A short-term moving average crossing bullish often forecast a trend continuation.
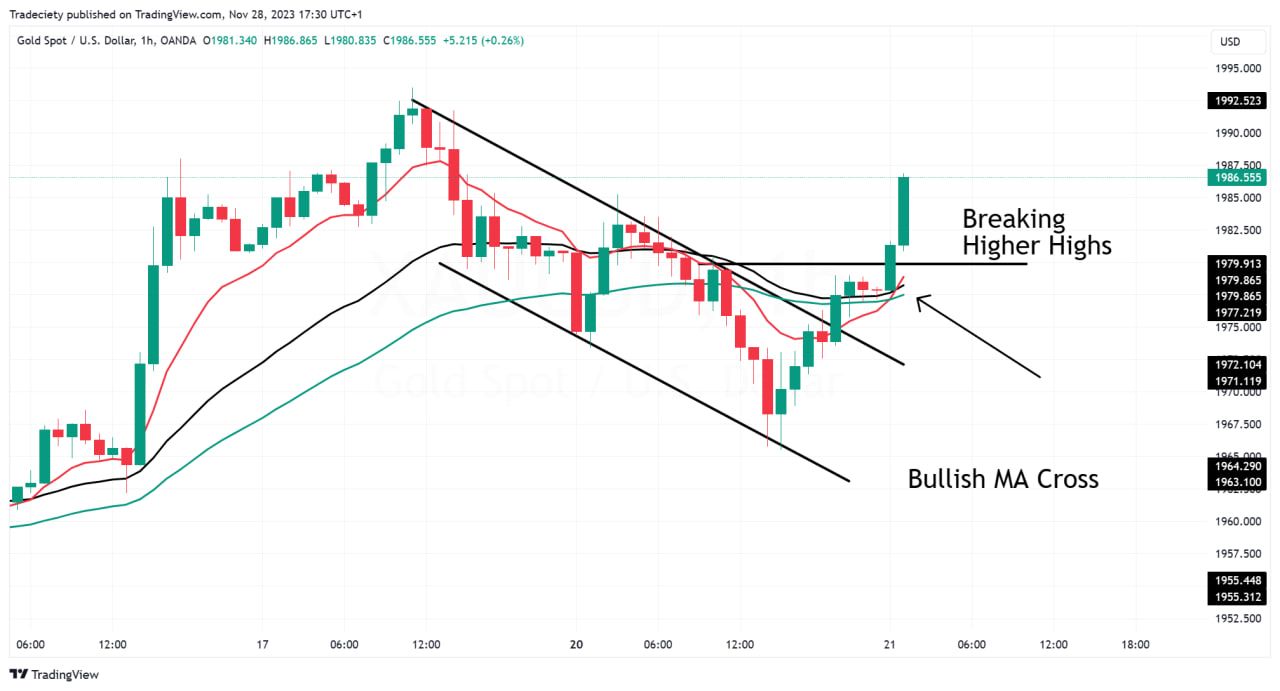
During the subsequent bullish phase, the 10 EMA (the red line) stays above the longer-term averages, confirming the trend’s strength.
4.4. Strategy 4: Break and Retest
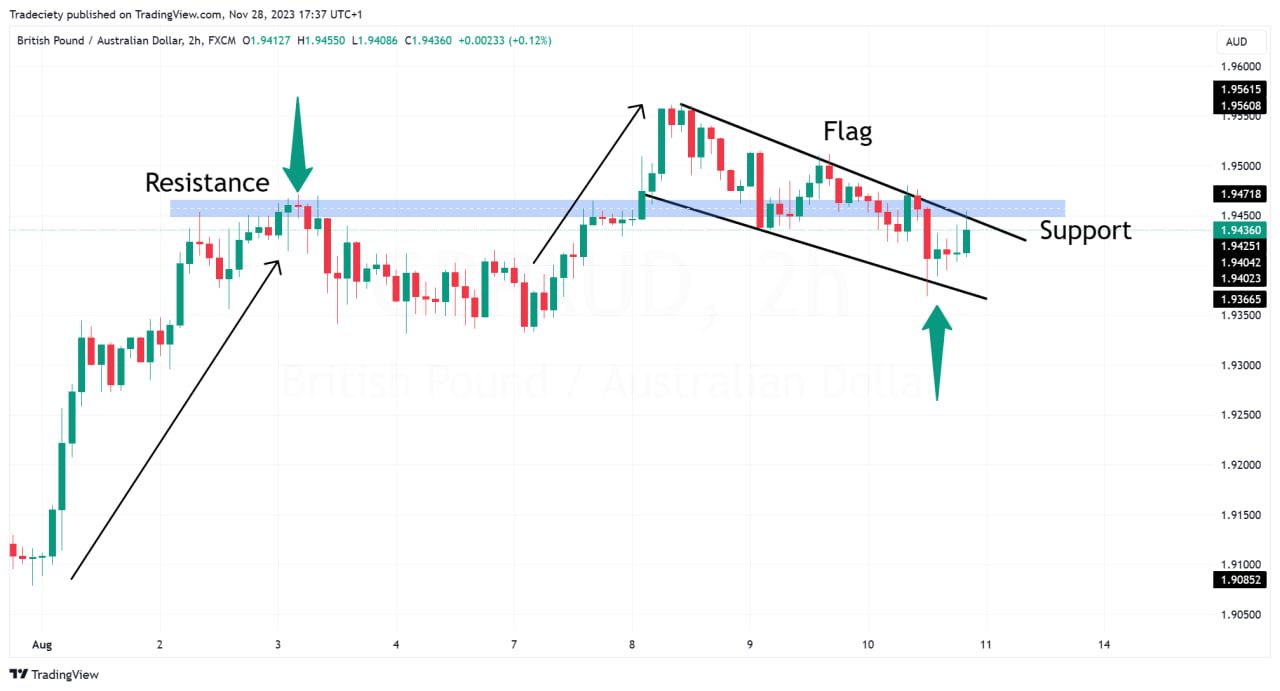
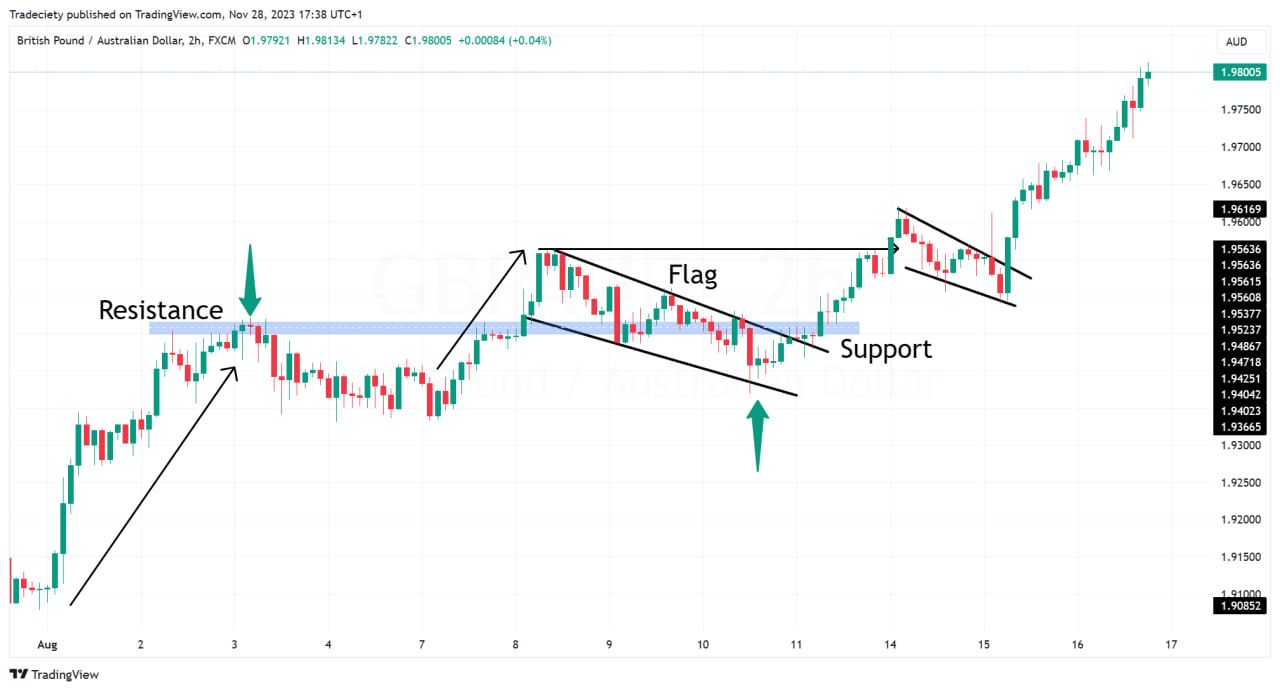
In the following example, a bull flag forms after breaking above a previous resistance level within a long-term uptrend. The bull flag then retests the previous resistance, now acting as support. Even if the price falls slightly below this support level, it doesn’t invalidate the quality of the bull flag. The overall setup and market context are more critical than precise price movements.
Once the first retest of the bull flag is broken, the trend wave resumes its upward momentum then forms a new, short-term bull flag. When this new flag breaks, the price continues to higher, following the ongoing uptrend.
5. Common Mistakes When Using Bull Flag vs Bear Flag
Understanding the nuances of the bull flag vs bear flag patterns is crucial for effective trading. However, several common mistakes can undermine their effectiveness.
5.1. Overlooking Confirmation Signals
One of the most frequent mistakes traders make with bull flag vs bear flag patterns is not waiting for confirmation signals. A common mistake is entering a trade based solely on the pattern without waiting for the breakout to confirm the trend.
For bull flags, this means not waiting for the price to break above the upper trendline. For bear flags, it involves not waiting for a price drop below the lower trendline. Confirmation is crucial to avoid false signals and improve the reliability of the pattern.
5.2. Ignoring Volume Dynamics
Another mistake is disregarding volume dynamics. In both bull flag vs bear flag patterns, volume plays a significant role in confirming the pattern’s validity. A common error is to enter a trade without noting the volume spikes that should accompany the breakout.
For a bull flag, increasing volume at the breakout point confirms the pattern and supports the continuation of the uptrend. Similarly, for a bear flag, higher volume during the breakout helps validate the downtrend.
5.3. Not Considering Market Context
Failing to consider the broader market context is also a common error. Traders often use bear vs bull flag patterns in isolation without analyzing the overall market trend or other influencing factors. A bull flag in a strong uptrend is more reliable, while a bear flag in a downtrend may have greater significance. Ignoring these contextual elements can lead to misinterpretations and poor trading decisions.
Conclusion
Understanding and identifying the bull flag vs bear flag patterns are key components of successful trading strategies. While no strategy guarantees success, implementing them with other indicators can get a better capitalize on potential market movements and increase your chances of making profitable trades.
And remember to avoid common mistakes when using bull flag vs bear flag by waiting for confirmation signals, paying attention to volume dynamics, and considering the broader market context. These practices will enhance your trading accuracy day by day.
Be sure to visit FMCPAY for more valuable crypto insights!

